Sunday, April 22, 2007

Detailing Secret

Soul Calibur II - Nightmare cosplay 
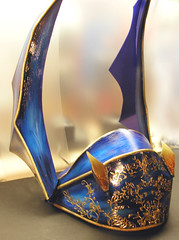
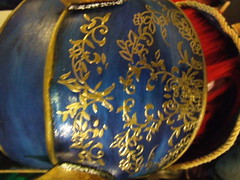
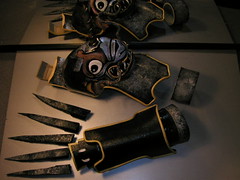
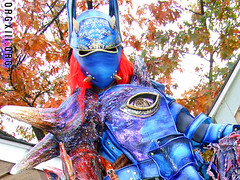
One of the most often asked questions about the Nightmare costume has been a surprise - how I pulled off the gold detailing on the helm visor and breastplate...and the answer is kinda silly: it's just a bunch of cut-up stickers. The particular brand I used is called "Class A'Peels" and they have a pretty extensive line of metallic finely die-cut decals - although if you check out any scrapbooking and paper crafts supply source, you can probably find even more.

The areas that I applied the stickers are made of Foamies (rather than the textured foam I used on most elsewhere) because they were flat and smooth enough to allow stickers to adhere to them. After painting the Foamies by hand to visually match the texture of the rest of the armor, I started placing them on and over each other, like making a mosaic - sorta intensive placement, but a very straight-forward task of just matching the swirls up. I honestly just eyeballed it all as I overlapped the stickers to recreate the shape of the actual filigree from the game model. After pressing them all into place, I also coated them in clear acrylic varnish decoupage-style so they would stay put.


P5090110 DSCF1856 243741

Thursday, April 19, 2007

Successful Wig Straigthening Log

Supposedly, only human-hair wigs are meant to be heat-styled, at risk of melting, frizzing or nuking. I found this to be true of cheaper costume wigs, and many normal "high-quality" European wigs.
However, every single wig we've experimented on containing Toyokalon (and comparable Japanese fibers) has held up and taken heat-straightening restyling without any damage to the strands. In order to get the results, I use a regular human-hair ceramic flat iron on setting 1 and clamp down briefly, repeatedly overlapping the heated areas.


DSCF1391
This black wig came with the long back strands perfectly straight already, but for some reason, the mid-length sections were curled inward originally. The editing is shown in the right of the picture.

DSCF1393
Here's a more extreme example. The side bangs here were originally as tightly curled as the back of the wig.
DSCF1395

DSCF2231
This is the wig I mutilated for Riku. (The original state is shown below.) Amongst other adjustments, straightening out the waves worked out well, and I still had a thick wig with good lift to spike the right way.
DSCF1843

Wednesday, April 18, 2007

Forming Albel's arm & claw armor

The base of the shoulder pieces were first shaped by applying Rigid Wrap (plaster gauze) in a negative mold (in this case, the inside of a rounded light casing) - this allowed a lightweight shell that could be easily smoothed with just water after air-drying. If the gauze strips had been applied to the outside, it would have appeared rough and layered (this is the stuff they use for making real casts for broken bones, etc.) but by using the inside of the shape to be molded, it is smooth.
The semi-brittle shell was then backed on the inside with multiple layers felt and hot glue...which rendered it nearly indestructible, as it was dropped-kicked down a flight of stairs with no damage.

P1040142

After completely drying and popping it out of the mold, the edges were trimmed and metallic silver and three shades of grey acrylic paint were dry-brushed on the armor and then finally coated in flexible acrylic gloss varnish. It had to be dry-brushed because if you get plaster wet after it is "dry" it will, of course, start running again. The paint and varnish should take care of that problem and seal it.


P5290400


By the way, the top of the shoulder piece include a foam pad + velcro, which wraps underneath the top shoulder-seam of the shirt and actually connects to the underside of the neck manacle. This makes the connection very stable when moving, plus comfortable and pretty hidden. Normally, I'd attach shoulder armor via other armor pieces (either with lacing, glue or magnents, depending on the mobility needed) - but Albel's silly and doesn't have extra armor or strapping or even sleeves. >XD

All of the rest of the arm armor segments are permanently closed tube segments (made of the "Magical Foam") and simply slip up onto my arm like a bracelet, and the claws are like tubular rings that slip on last over the glove. The top neck guard piece on the shoulder also was a slice of this slightly curved thermoformed foam, hot-glued into its slot.


Specific products used :
- thermoform foam
- heat gun (to mold the above)
- Rigid Wrap
- Liquitex medium viscosity acrylic paint and flexible varnish