Saeru has begun compiling every useful bit of research, patterning & supply locations for the construction of accurate Organization XIII costumes - including weapon, wigs and coat tutorials here.
(And, if you need help with the Organization coat, chains/beads, wigs or props (or the whole cosplay) we do accept commission requests now.)
Wednesday, June 27, 2007
Wednesday, June 13, 2007
Armor Edging, Tech #1 & #1.5
After the majority of an armor piece is assembled it is more than functional for costume use, but by adding a visual edge to it, non-metal armor can look more realistic, as most designs contain (or imply) a border to armor pieces.
Sometimes a flat airbrushed look is good for more sci-fi-inspired characters, but beyond just painting on a line along the edges to match a flat illustration, a piece can look even more significant with an actual dimensional edge. This also helps the ends of the chosen materials to be structurally sturdier, and gives a cleaner line and consistent edge width.
The basic approach is to attach trim directly along the outer top perimeter of the piece. A slightly textured grain is usually best for disguising where the edges will intersect. Satin-y ribbon is not recommended, as it frays easily (and is hard to Fray-Check without discoloring - as I learned from working on my first YURA) plus photographs kinda strangely. An alternative to pricy ribbon by the yard is also to dig through flat-style yarns. One gets a lot more that way and sometimes there are more interesting options than what is in the normal trim section. I've personally also used shoelaces and Foamie strips. If something is the right width and thickness, it can always be hand-painted or dyed to be the correct color, in any case.
To go a step further, to simulate a formed metal piece, fabric piping can be attached along on the -inside- edge of the armor piece, to give a rounded "lip" to the ends, where the curve extends over the edge from underneath, outlining the armor. Piping applied this way can be bent at the corners in a more believable way than a top-layer ribbon can be. It can also be sandwiched in the middle of intersecting planes for rounded corners.
Small gauge piping can be found packaged in the notions section of the fabric store - however, most times, I tend to want a much wider curve than prepackaged piping allots for, such as for Nightmare. Pre-made, uncolored thicker piping can sometimes be found with the drapery-making supplies, but recently I've not been able to locate any. Luckily, it can easily be replicated by hand, by sewing a casing of cotton strip with rope on the inside to give it its shape.
For more complicated designs, a more textured cord or a braided rope can be substituted for extra ornate-ness. These can be found in the home-dec supplies, usually sold by the yard.
Sometimes a flat airbrushed look is good for more sci-fi-inspired characters, but beyond just painting on a line along the edges to match a flat illustration, a piece can look even more significant with an actual dimensional edge. This also helps the ends of the chosen materials to be structurally sturdier, and gives a cleaner line and consistent edge width.
The basic approach is to attach trim directly along the outer top perimeter of the piece. A slightly textured grain is usually best for disguising where the edges will intersect. Satin-y ribbon is not recommended, as it frays easily (and is hard to Fray-Check without discoloring - as I learned from working on my first YURA) plus photographs kinda strangely. An alternative to pricy ribbon by the yard is also to dig through flat-style yarns. One gets a lot more that way and sometimes there are more interesting options than what is in the normal trim section. I've personally also used shoelaces and Foamie strips. If something is the right width and thickness, it can always be hand-painted or dyed to be the correct color, in any case.
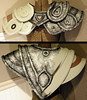
 The basic look of "flat ribbon along an edge" tech is shown here in the armor for my second YURA outfit. To get around having to match up all the corners, I actually cheated in this case and cut the exact outline shape out of stretch vinyl, like a big wobbly O-like shape. If just ribbon had been used here, many individual pieces would have had to be matched at the corners. Since I was replicating a costume that does physically exist (and his real costume doesn't seem to have trim splice-lines) I had to opt for this more complicated method. |
To go a step further, to simulate a formed metal piece, fabric piping can be attached along on the -inside- edge of the armor piece, to give a rounded "lip" to the ends, where the curve extends over the edge from underneath, outlining the armor. Piping applied this way can be bent at the corners in a more believable way than a top-layer ribbon can be. It can also be sandwiched in the middle of intersecting planes for rounded corners.
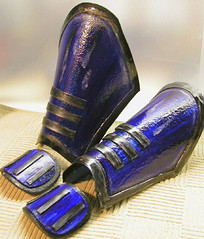
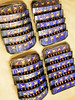
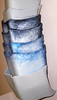
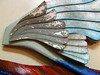
 Thick piping here makes up all the gold lines on the edge of the plates. 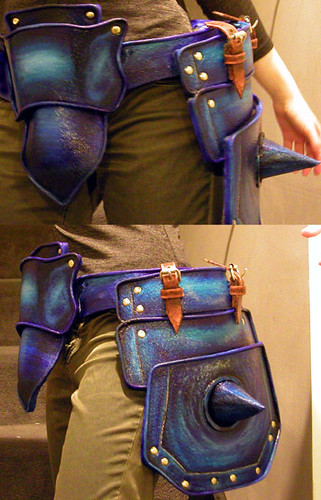 & all the piping here is the exact same stuff as above, just painted blue. Instead of just sitting on the top surface, it fully covers the side edge of each piece and is wrapped around to the back underside. |
Small gauge piping can be found packaged in the notions section of the fabric store - however, most times, I tend to want a much wider curve than prepackaged piping allots for, such as for Nightmare. Pre-made, uncolored thicker piping can sometimes be found with the drapery-making supplies, but recently I've not been able to locate any. Luckily, it can easily be replicated by hand, by sewing a casing of cotton strip with rope on the inside to give it its shape.
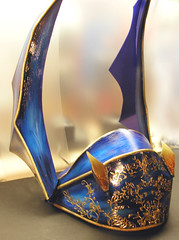
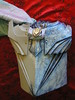
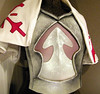
 Albel's gauntlet was a combination of no edge, a painted edge, a flat trim edge and a rounded piping edge. The piping here has been painted gold and glossed to match the shiny look of the rest of the armor. |
For more complicated designs, a more textured cord or a braided rope can be substituted for extra ornate-ness. These can be found in the home-dec supplies, usually sold by the yard.
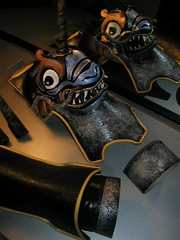
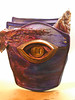
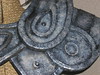
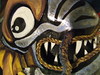 The mouth of the creature's face on Albel's shoulder armor uses a twisted cord, to add an extra highlight to that detail. |
Sunday, June 10, 2007
Anti - Form Sora Shoes (by Saeru)
Sora's shoes started out as a dream I thought would never happen. In my little world of cosplay, shoes were ALWAYS bought, and then modified. Shoes were not something that one constructed...
Unfortunately, Sora's shoes do not exist. This is probably a good thing, because there would be many more cases of people injuring themselves after tripping over their own huge feet.
Personally, I didn't want to end up in the hospital.
Ever gone scuba diving? Snorkeling? Maybe just played in the backyard pool as a kid?
How about those fins.
You know, the kind that make your feet look like funny frog legs. As soon as you get out of water, you're stuck with these huge pieces of plastic and no hope of walking around without them curling up and trying to make you fall flat on your face.
This became the first Sora dilemma.
Remember how I said that purchasing that action figure was one of the best moves I could have made? Here is reason number 2: Valor's feet have this awesome little pivot built into them. It allows you to stand him, easily, on pretty much any angled surface. They're also extremely pleasant to just play with.
This concept ended up saving my Sora shoes, as I decided that I, too, would build them with a pivot. In this manner I was able to walk, run, crouch, squat, and slink about without having to worry about my thin plastic clown shoes busting or the zipper seams popping out.
So here is what I did!
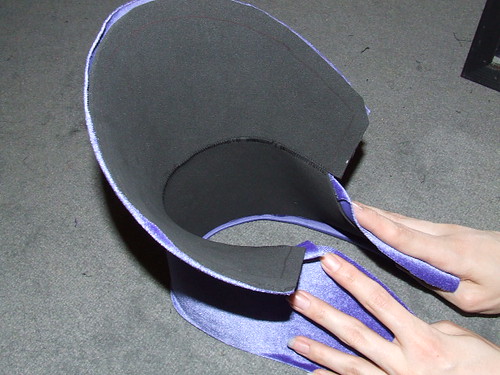
I bought a pair of clown shoes. Thankfully this was easy at the time that I began, because it was Halloween. I walked into a costume store, and picked up a pair for 2 dollars. Thinking this was swell, I grabbed another pair for later use. >.> Upon getting home I realized that a pair of clown shoes were, as I suspected, extremely difficult to walk in, so I cut off the back half, leaving just the front 'hump' of the shoe. However, the front hump was too WIDE to fit snuggly over my foot, so I cut it in half again, across the center. Sora's zipper was going to need to go there, anyhow. Thus, in the end, I had two bisected pieces of clown shoe to make the front.

Initial Shoe Test
It was time to move onward! The base shoes that I chose were a pair of No Boundaries Converses, available at Wal-Mart for about 10 dollars. The clown hump fit over the front of them nicely, and they were a good shape. Plus they were comfortable! Which makes them one of the few pairs of cosplay shoes I actually don't mind wearing. ^.^ To attach the clowns onto the converses, I drilled a hole through the sides just big enough to fit a Chicago screw.
Lemme talk for a moment about Chicago screws. They're not called Chicago screws here, because I'm in Chicago. Here, I believe they call them screw posts.
Screw Posts
These are the most wonderful little screws known to man. They've ended up having uses in almost every costume I've ever made, even when I didn't expect to be using them at all. They come in a variety of sizes, and, unlike the normal nut/bolt combination, you get a flat head on both sides of whatever you're screwing together(which is great for comfort purposes, especially on the inside of a shoe). These can be purchased easily at any hardware store.
Screw posts were used as my pivot, and held my shoes together.
Screwed Shoes
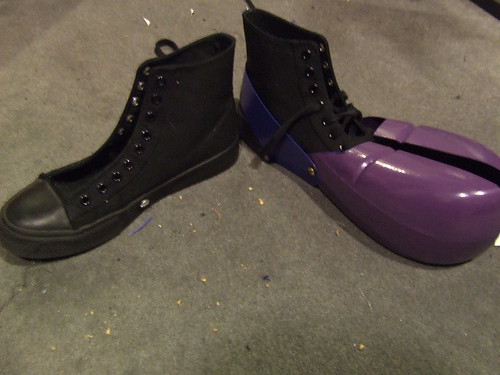
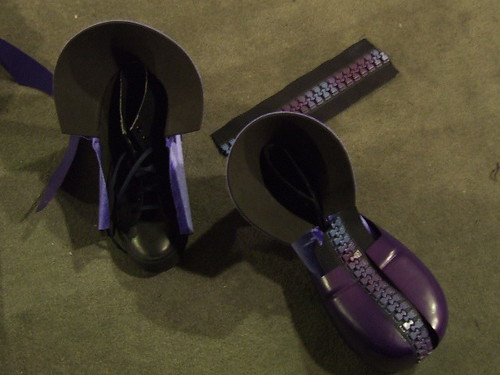
Having now the basic elements of my shoe, it was time to make its covering. Sora's shoes have an unusual shape to them, being something like high-tops but looking more like cloth. The color irritated me, however, since it was the same shimmery purple that was present in all the edging on my outfit: the stuff that I had used stretch velvet on. Purple stretch velvet was NOT going to make a nice, smooth shoe cover, so I tried a little something new. I liquid-stitched the velvet onto black 3mm foamies, and then trimmed it down to the exact shape it was supposed to be in.
Sewn Foamies and Liquid-stitched velvet...
Liquid stitch is a fabric glue that comes HIGHLY recommended by me.
Liquid Stitch!
You can buy it at wal-mart, or at a local craft store. As I found out, it is also very good for attatching fabric onto foamies. Be careful, as if you apply it too thickly behind a thin fabric, it WILL seep through. But if you spread a thin layer, then it adheres just lovely.
For best results with liquid-stitch, allow it to dry overnight.
So now I had a basic shoe pattern and back, but I wanted to do something a little more--adding treads.
Backpattern and Treads
This ended up being a rather complicated process overall, as I cut the treads out of 6mm foam(foamies could be used, although we had a different kind lying around), and still needed to apply some sort of coating to alleviate the 'foam' look. What I ended up doing was coating the treads in about 5 layers of 'Plasticoat,' which is a spray rubber available at Lowes. Its the same sort of stuff that people use to rubberize their truck beds, and it helped seal and protect my shoe treads. Following this, I sprayed them with my purples to give them a gradient.
I used gradients as much as possible on Sora, since he's got such a shifty color scheme. It ended up giving a lot of depth to otherwise flat places, especially on the shoe zipper. Here are my shoes at this stage, with the back cover attached and the clown part in place:
Shoe Progress...
The zipper is not yet attached to the shoe, making that the next step in my process.
These zippers were wonderful things in making Sora. Originally I had intended to use a #10 black plastic biker's zipper, but when I tested the shoe with that, the zipper completely disappeared when one stepped a foot or two away. I needed something larger, so I took one of the #30 zippers we had lying around, cut it in half, sprayed it in a gradient, and saw that it worked AMAZINGLY better. Even nicer was that the cloth tape didn't take the spray-paint, but the plastic zipper did, so the tape remained black on my now purple zipper. ^.^ These can be purchased from the following site, and, as far as I can tell, can only be purchased from here(unless you wanna spend 600 dollars on #30 zipper chain):
Giant #30 Kingdom Hearts Zippers!
But how to attach the zippers to the clown shoe? I was not about to trust ANY sort of glue to adhere a heavy zipper tape onto a plastic, spray-painted clown shoe. I considered stapling, but found it impossible to get at the right angle to do so. Thus a crazy idea was born: I would hand sew the zippers to the shoe.
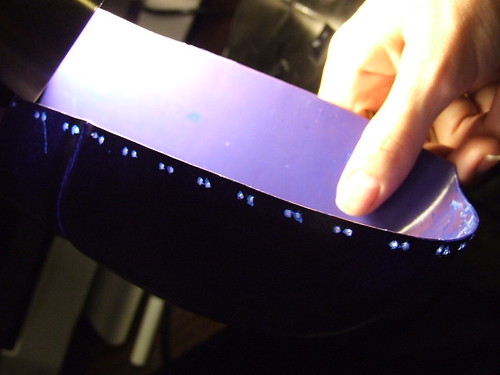
Holes
96 tiny holes later, I began the process.
Getting close...
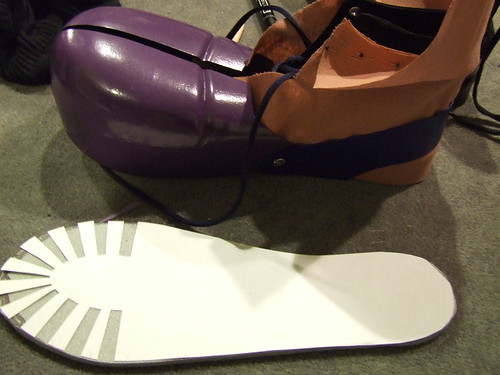
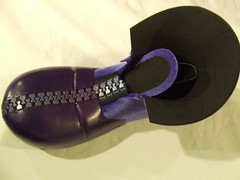
With the zipper on and the clown shoe attached, my shoe was starting to look good! I made a tongue out of more black foamies, and then retrieved my treads for the long gluing process.
I examined several pairs of shoes that were lying around, and noticed that there was a nice bead seam between the treads and the shoes. To duplicate this seam, I grabbed up some piping, painted it black, and attached it to the treads.

Gluing
The glue I used at this point was called Contact Cement, supposedly a good glue for adhering cloth to plastic/rubber. This glue was functional, although it did start to come off after several hours of wearing my Sora shoes around. I would suggest something stronger, and I will probably be using a 2-ton epoxy when I re-do my shoes. One thing to note is that powerful glues tend to dissolve spraypaint, so be cautious when gluing that you don't drip it ANYWHERE.
Contact cement, also, adheres on contact(hence the name), so I had to be EXTREMELY careful when I attached the soles to get the placement right on the first go. This took a few 'placement' runs, before I actually put the glue on. But it seemed to go well!

Shoe Tread
The only thing I had left to do was attach Sora's straps onto the bottoms of his shoes. The initial step for this had to be done BEFORE I put on the treads, since his straps disappear beneath them. In the beginning, I had wanted to use the same black material for straps that I had used in the rest of the outfit, but I realized that would require me attatching velcro to the straps so I could get my feet in and out of the shoes. It would also require extremely exact placement of his shoe-buckles, which un-nerved me quite a bit. To alleviate this problem, I went with a nice stretchy elastic strap on his shoes, which allowed me to put my feet in without ever even removing the straps.

Almost There!
At this point, the shoe is pretty much done. The only additional step that I did was to add a nib in the front, and put some trim on the edge of the zipper to cover up the thread from where I sewed it on. Voila! A Sora shoe. ^.^
Unfortunately, Sora's shoes do not exist. This is probably a good thing, because there would be many more cases of people injuring themselves after tripping over their own huge feet.
Personally, I didn't want to end up in the hospital.
Ever gone scuba diving? Snorkeling? Maybe just played in the backyard pool as a kid?
How about those fins.
You know, the kind that make your feet look like funny frog legs. As soon as you get out of water, you're stuck with these huge pieces of plastic and no hope of walking around without them curling up and trying to make you fall flat on your face.
This became the first Sora dilemma.
Remember how I said that purchasing that action figure was one of the best moves I could have made? Here is reason number 2: Valor's feet have this awesome little pivot built into them. It allows you to stand him, easily, on pretty much any angled surface. They're also extremely pleasant to just play with.
This concept ended up saving my Sora shoes, as I decided that I, too, would build them with a pivot. In this manner I was able to walk, run, crouch, squat, and slink about without having to worry about my thin plastic clown shoes busting or the zipper seams popping out.
So here is what I did!
I bought a pair of clown shoes. Thankfully this was easy at the time that I began, because it was Halloween. I walked into a costume store, and picked up a pair for 2 dollars. Thinking this was swell, I grabbed another pair for later use. >.> Upon getting home I realized that a pair of clown shoes were, as I suspected, extremely difficult to walk in, so I cut off the back half, leaving just the front 'hump' of the shoe. However, the front hump was too WIDE to fit snuggly over my foot, so I cut it in half again, across the center. Sora's zipper was going to need to go there, anyhow. Thus, in the end, I had two bisected pieces of clown shoe to make the front.
Initial Shoe Test
It was time to move onward! The base shoes that I chose were a pair of No Boundaries Converses, available at Wal-Mart for about 10 dollars. The clown hump fit over the front of them nicely, and they were a good shape. Plus they were comfortable! Which makes them one of the few pairs of cosplay shoes I actually don't mind wearing. ^.^ To attach the clowns onto the converses, I drilled a hole through the sides just big enough to fit a Chicago screw.
Lemme talk for a moment about Chicago screws. They're not called Chicago screws here, because I'm in Chicago. Here, I believe they call them screw posts.
Screw Posts
These are the most wonderful little screws known to man. They've ended up having uses in almost every costume I've ever made, even when I didn't expect to be using them at all. They come in a variety of sizes, and, unlike the normal nut/bolt combination, you get a flat head on both sides of whatever you're screwing together(which is great for comfort purposes, especially on the inside of a shoe). These can be purchased easily at any hardware store.
Screw posts were used as my pivot, and held my shoes together.
Screwed Shoes
Having now the basic elements of my shoe, it was time to make its covering. Sora's shoes have an unusual shape to them, being something like high-tops but looking more like cloth. The color irritated me, however, since it was the same shimmery purple that was present in all the edging on my outfit: the stuff that I had used stretch velvet on. Purple stretch velvet was NOT going to make a nice, smooth shoe cover, so I tried a little something new. I liquid-stitched the velvet onto black 3mm foamies, and then trimmed it down to the exact shape it was supposed to be in.
Sewn Foamies and Liquid-stitched velvet...
Liquid stitch is a fabric glue that comes HIGHLY recommended by me.
Liquid Stitch!
You can buy it at wal-mart, or at a local craft store. As I found out, it is also very good for attatching fabric onto foamies. Be careful, as if you apply it too thickly behind a thin fabric, it WILL seep through. But if you spread a thin layer, then it adheres just lovely.
For best results with liquid-stitch, allow it to dry overnight.
So now I had a basic shoe pattern and back, but I wanted to do something a little more--adding treads.
Backpattern and Treads
This ended up being a rather complicated process overall, as I cut the treads out of 6mm foam(foamies could be used, although we had a different kind lying around), and still needed to apply some sort of coating to alleviate the 'foam' look. What I ended up doing was coating the treads in about 5 layers of 'Plasticoat,' which is a spray rubber available at Lowes. Its the same sort of stuff that people use to rubberize their truck beds, and it helped seal and protect my shoe treads. Following this, I sprayed them with my purples to give them a gradient.
I used gradients as much as possible on Sora, since he's got such a shifty color scheme. It ended up giving a lot of depth to otherwise flat places, especially on the shoe zipper. Here are my shoes at this stage, with the back cover attached and the clown part in place:
Shoe Progress...
The zipper is not yet attached to the shoe, making that the next step in my process.
These zippers were wonderful things in making Sora. Originally I had intended to use a #10 black plastic biker's zipper, but when I tested the shoe with that, the zipper completely disappeared when one stepped a foot or two away. I needed something larger, so I took one of the #30 zippers we had lying around, cut it in half, sprayed it in a gradient, and saw that it worked AMAZINGLY better. Even nicer was that the cloth tape didn't take the spray-paint, but the plastic zipper did, so the tape remained black on my now purple zipper. ^.^ These can be purchased from the following site, and, as far as I can tell, can only be purchased from here(unless you wanna spend 600 dollars on #30 zipper chain):
Giant #30 Kingdom Hearts Zippers!
But how to attach the zippers to the clown shoe? I was not about to trust ANY sort of glue to adhere a heavy zipper tape onto a plastic, spray-painted clown shoe. I considered stapling, but found it impossible to get at the right angle to do so. Thus a crazy idea was born: I would hand sew the zippers to the shoe.
Holes
96 tiny holes later, I began the process.
Getting close...
With the zipper on and the clown shoe attached, my shoe was starting to look good! I made a tongue out of more black foamies, and then retrieved my treads for the long gluing process.
I examined several pairs of shoes that were lying around, and noticed that there was a nice bead seam between the treads and the shoes. To duplicate this seam, I grabbed up some piping, painted it black, and attached it to the treads.
Gluing
The glue I used at this point was called Contact Cement, supposedly a good glue for adhering cloth to plastic/rubber. This glue was functional, although it did start to come off after several hours of wearing my Sora shoes around. I would suggest something stronger, and I will probably be using a 2-ton epoxy when I re-do my shoes. One thing to note is that powerful glues tend to dissolve spraypaint, so be cautious when gluing that you don't drip it ANYWHERE.
Contact cement, also, adheres on contact(hence the name), so I had to be EXTREMELY careful when I attached the soles to get the placement right on the first go. This took a few 'placement' runs, before I actually put the glue on. But it seemed to go well!
Shoe Tread
The only thing I had left to do was attach Sora's straps onto the bottoms of his shoes. The initial step for this had to be done BEFORE I put on the treads, since his straps disappear beneath them. In the beginning, I had wanted to use the same black material for straps that I had used in the rest of the outfit, but I realized that would require me attatching velcro to the straps so I could get my feet in and out of the shoes. It would also require extremely exact placement of his shoe-buckles, which un-nerved me quite a bit. To alleviate this problem, I went with a nice stretchy elastic strap on his shoes, which allowed me to put my feet in without ever even removing the straps.
Almost There!
At this point, the shoe is pretty much done. The only additional step that I did was to add a nib in the front, and put some trim on the edge of the zipper to cover up the thread from where I sewed it on. Voila! A Sora shoe. ^.^
Thursday, June 7, 2007
"What is your armor made out of?"
The answer varies slightly for each project...
I have used small portions of 3mm to 6mm Foamies (and other similar closed-cell craft foam) and Styrene sheeting such as Sintra (which Saeru uses much more than I do) from time to time in detail areas, but the majority of my armor has been based from the stunningly wonderful "Mystery Foam" that I discovered by fluke from American Science & Surplus.
Some of examples with it in use (in some cases with other materials)


Now, the website claims that it is "Insulite" - which it is not, as it does not share all the properties of real Insulite of which I have procured a sample from the manufacturer to compare. I've been trying to get AS&S to figure out what it -really- is for -years- but nobody really knows. Anyway...
Why I like this stuff:
This foam is also very very cheap for what can be gotten out of it. If you do not happen to live near Milwaukee, Chicago or Geneva, you can actually buy some of this miraculous foam from the online selection, but it will be the smaller sheets than what can be found in the stores.
(By the way, if anyone can help me identify what my foam truly is, I'd love to know cuz I want to have a back-up in case AS&S ever stops handling it.)
* New * We have a lead that this might be similar to "Lionboard" so I will try to find a sample to compare the two.
* Newest * AS&S no longer carries large pieces of the foam in the stores (just the smaller thicker olive-colored sheets)...however, a blue-colored version of this foam has been spotted in the camping section of Wal-mart marked as a sleeping pad.
I have used small portions of 3mm to 6mm Foamies (and other similar closed-cell craft foam) and Styrene sheeting such as Sintra (which Saeru uses much more than I do) from time to time in detail areas, but the majority of my armor has been based from the stunningly wonderful "Mystery Foam" that I discovered by fluke from American Science & Surplus.
Now, the website claims that it is "Insulite" - which it is not, as it does not share all the properties of real Insulite of which I have procured a sample from the manufacturer to compare. I've been trying to get AS&S to figure out what it -really- is for -years- but nobody really knows. Anyway...
Why I like this stuff:
- It is easily cut with normal tools (scissors, razors, etc. Hot wire cutters not needed)
- It is extremely lightweight and actually soft - which is great to wear and transport, but being thicker than styrene sheeting makes it more significantly-weighted-looking. (Most of the time, this is desirable as it doesn't look like a piece of cardboard. For really delicate joint areas, I still recommend swapping in some thinner hard plastic sheeting like Styrene.)
- It can be bent, curved and heat-formed in all ways that Styrene can.
- The corners can be sanded-down and rounded somewhat with a rotary tool.
- Unlike Styrene which needs rivets, staples &/or fume-y epoxies or plastic cements, you can validly use hot glue for a permanent connection. Instead of just -adhering- the pieces of foam together, high temperature hot glue will actually slightly melt and fuse the edges of the foam to each other.
- It does have -texture- which admittedly isn't great for sci-fi fiberglassy-smooth mecha-stuff, but as I'm always simulating stone or bio-masses or weathered beat-up metals, having a starting texture saves me a few steps. It does -not- have that terrible duct-tape-looking mesh weave that you find on Wonderflex, and only requires thick coatings of paint &/or gloss if you are looking for a smoother effect. If you are looking for a -very- smooth texture, Foamies aren't a bad way to go - the thicker Foamies just don't come in very big continual sheets, is all.
- The foam does not like spray-paint very much, but that's okay, because I don't either. XD (Spray-paint, even good Krylon, will flake off pretty rapidly. Spray-paint will not, however, eat-away at this foam as tends to happen with open-celled Styrofoam.) Good medium to high-viscosity acrylic (such as Liquitex) will however adhere wonderfully if you're willing to hand-paint it - the plastics meld together and everything remains flexible so it cannot crack off. And! after painting is complete, the paint-job can be protected and made metal-looking with Liquitex "Gloss Varnish Flexible Surface."
This foam is also very very cheap for what can be gotten out of it. If you do not happen to live near Milwaukee, Chicago or Geneva, you can actually buy some of this miraculous foam from the online selection, but it will be the smaller sheets than what can be found in the stores.
(By the way, if anyone can help me identify what my foam truly is, I'd love to know cuz I want to have a back-up in case AS&S ever stops handling it.)
* New * We have a lead that this might be similar to "Lionboard" so I will try to find a sample to compare the two.
* Newest * AS&S no longer carries large pieces of the foam in the stores (just the smaller thicker olive-colored sheets)...however, a blue-colored version of this foam has been spotted in the camping section of Wal-mart marked as a sleeping pad.
Subscribe to:
Posts (Atom)

